A graphic design workflow is the process of ideation to completion of a graphic design concept.
Although designers have different preparation rituals, successful graphic designers usually follow a similar process.
A solid graphic design process helps them deliver quality work that exceeds clients’ expectations.
So, what does a solid graphic design workflow look like?
This article will take you through the steps of creating an effective graphic design process.
But first, let’s look at how a well-planned graphic design process can benefit you.
You can skip to a section by clicking the link below:
✅ Design better and impress your clients with a solid workflow plus Piktochart’s ready-to-edit templates
What are the benefits of a good graphic design workflow?
A good graphic design workflow is useful not just because it gets the job done. It can also help you be more organized with your tasks, adding an element of predictability to your design process.

Here are the benefits of an excellent graphic design process:
1. It keeps you organized
A good graphic design process helps you stay organized. An established plan eliminates guesswork from your workflows and allows you to estimate task durations accurately. You’ll always know where to start and how to run the entire project until the end.
2. It boosts efficiency
A graphic design process optimizes your workflows and minimizes the wastage of critical resources like time and effort. In doing so, it boosts efficiency, and this ultimately increases the ROI (return of investment) of your efforts.
3. It helps you deliver excellent work
Finally, a graphic design process will help you deliver excellent results at all times. Each step of the intricate process ensures that every detail is accounted for.
The details help you see the bigger picture, making it possible to create an output that meets the client’s expectations.
Creating and following a solid process makes it easier to complete projects on time. It also opens opportunities to scale your graphic design practice by boosting efficiency and client satisfaction.
Let’s now look at how you can create a graphic design workflow.
6 steps to creating an effective graphic design workflow
A good graphic design workflow leaves no stone unturned, from discussing client expectations to presenting the finished product.
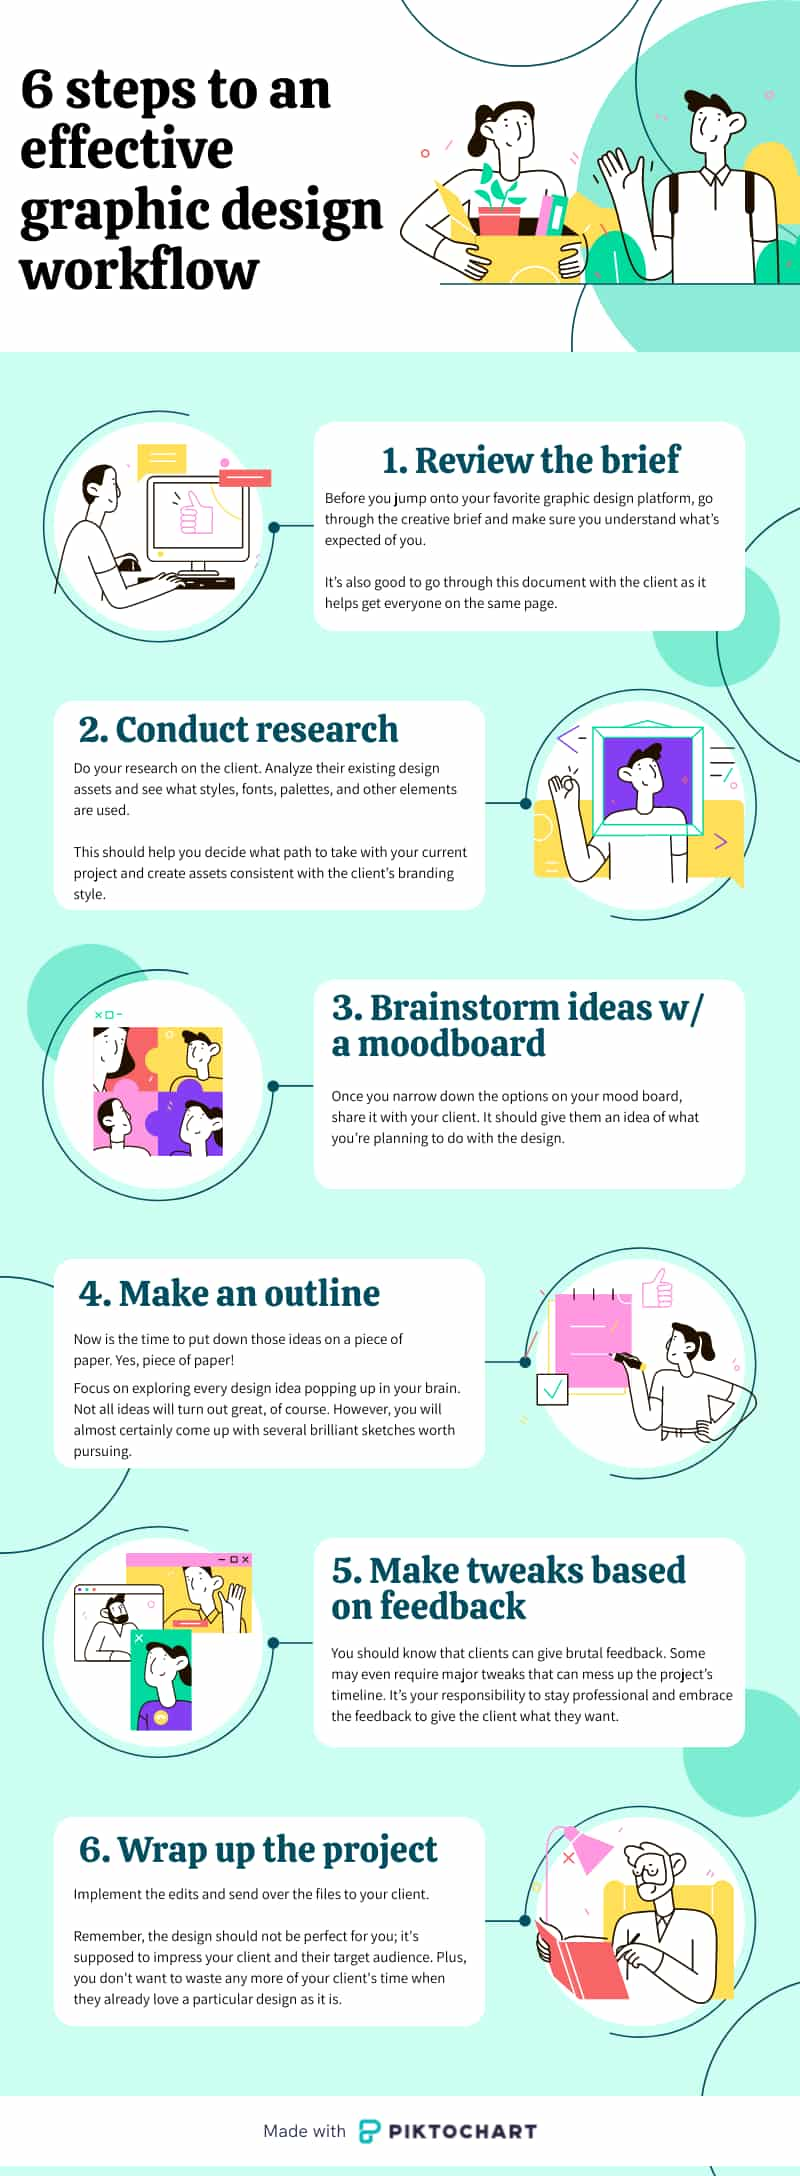
You can break the procedure down into six critical steps. These are:
1. Review the brief
Reviewing the creative brief is arguably the most critical stage of the graphic design workflow. Mess up at this point, and you risk losing time and resources on a product that does not align with the client’s needs.
On the brighter side, everything else becomes much easier if you analyze the creative brief correctly.
Before you jump onto your favorite graphic design platform, go through the creative brief and make sure you understand what’s expected of you.
It’s also good to go through this document with the client as it helps get everyone on the same page.
Although some clients will approach you with a comprehensive brief in hand, it’s best to have your own design brief template.
Think about your previous projects and all the details you needed to create the designs. Then, use those details to create a comprehensive design brief template.
You can then use your template as a guide to ensure clients give you all the information required beforehand. You don’t want to bother a client for additional information once the creative process begins.
What kind of information should the design brief contain?
The brief should cover:
- Project goals or client expectations of the design
- The objective of the design
- Project deadline
- Brand guidelines and elements like preference for asymmetrical balance, font types, shapes, and color palettes.
- Budget
- Target audience
A creative brief template could look like this:
Create the design brief in PDF format, or include it in the contract. You may refer to this document if you have a dispute with the client over the scope and direction of the project. Plus, a standalone design brief makes you look more professional.
2. Conduct additional research to gain more insights about the project
The design brief is an information gold mine, but you cannot rely on it alone to create the perfect design assets.
You must conduct additional research to gain more insights on the topic and what you could do to make your design stand out.
Do your research on the client. Analyze their existing design assets and see what styles, fonts, palettes, and other elements are used. This should help you decide what path to take with your current project and create assets consistent with the client’s branding style.
For example, if you are supposed to build a business website for a client, checking out their logo and other branding assets can help you design a site that blends perfectly with their existing brand style guide for a consistent brand experience.
In addition, look at your client’s competitors. What elements are incorporated in their designs, and how well do those designs look? What message does one get from seeing the designs? That’s another area you can get inspiration from.
Competitor research can show you the design elements that don’t work too well. It also helps you avoid creating designs similar to your client’s competitors.

Besides competitor research, you should conduct overall market research. Keep an eye out for any consistent graphic design trends.
For example, check if other companies in that industry use specific colors or fonts. If such trends exist, those design elements probably work well with customers in that industry. You don’t have to follow that trend, but it’s something you could consider.
3. Brainstorm ideas and put them on a mood board
Mood boarding is an essential part of the graphic design workflow. It helps visualize the project’s goal and gives you a foundation to build upon. You can compile all the inspiration you’ve gathered from your research and put them on a mood board.
Now, different designers have different mood boarding preferences. Some designers love creating a physical mood board and filling it with printouts.
Others prefer digital mood boards, which are very helpful, especially when collaborating with other designers remotely.
Whether you love a traditional or digital mood board, you should create one to brainstorm potential design ideas with your team. For example, the mood board below shows a few potential designs that use nature to communicate tranquility:

Once you narrow down the options on your mood board, share it with your client. It should give them an idea of what you’re planning to do with the design. This step is particularly important when working with a client with strict expectations for the design.
Share your creative vision and ideas fast with mood boards.
Make your mood board in minutes. Get access to thousands of photographs, illustrations, icons, and visuals in Piktochart.
Try Piktochart for free
4. Make an outline
Mood boarding and brainstorming will fill your brain with lots of design ideas. Now is the time to put down those ideas on a piece of paper. Yes, piece of paper!
Of course, you can sketch the outlines on a computer or iPad but doing so on cardboard or A3 paper is better for various reasons.
For starters, using a pen and paper minimizes distractions and boosts your creativity. It keeps your eyes and brain focused on the design and away from digital distractions like email and social notifications. This allows your brain to wander, allowing you to explore more design ideas.
Try to create as many sketches as possible. You don’t have to spend too much time on the nitty-gritty details of each sketch at this point.
Focus on exploring every design idea popping up in your brain. Not all ideas will turn out great, of course. However, you will almost certainly come up with several brilliant sketches worth pursuing.
During your sketching sessions, you may also get some ideas on the colors or fonts to use with certain concepts. Don’t ignore those ideas. Instead, write them next to each concept.
Once you’re done sketching, pick the cream of the crop and share those concepts with your client.
You can also use a progress report if you need to update your team or client regularly. Use the template below to get started.
Again, you don’t have to make the perfect sketches. They just need to be detailed enough to give the client an idea of what you hope to achieve with each concept.
5. Make tweaks based on feedback
A successful graphic design workflow takes advantage of two types of feedback.

The first is internal feedback. Unfortunately, you can only get this if you’re working with a design team. Here, the idea is to show your sketch to fellow teammates for scrutiny and then use their feedback to enhance your concept.
What happens if you don’t have a team?
Freelance graphic designers should consider joining a community of fellow creatives. By joining a community, you can connect with like-minded professionals who provide constructive feedback.
The second type of feedback is external. This is where you will submit the sketch to your client, get feedback from them, then modify the design accordingly.
If you’re working remotely, consider asynchronous video correspondence. You could record a brief video sharing your designs with your client, and ask for feedback through a video or voice message in return.
You should know that clients can give brutal feedback. Some may even require major tweaks that can mess up the project’s timeline. It’s your responsibility to stay professional and embrace the feedback to give the client what they want.
You should also remember the requirements as stipulated in the design brief. If the requested amendments affect the project’s timeline, discuss it with the client. You can ask for more time to make the necessary adjustment. If the requested amendments were not part of the agreement on the brief, discuss an additional payment with the client.
6. Wrap up the project
When the client picks their favorite design and sends their feedback, you’re ready to wrap up the project.
You can request a brainstorming session and discuss how to implement the requested revisions, where you might do a brief SWOT analysis of the shortlisted designs. The session should be more straightforward since you now have a specific design and more structured client feedback to work with.
At this point, watch out for the urge to experiment or refine the design more than is required. That’s something many designers struggle with.
This is not the time to start exploring your creativity. The client already likes a particular design and has specified the amendments they want. Implement the edits and send over the files to your client.
Remember, the design should not be perfect for you; it’s supposed to impress your client and their target audience. Plus, you don’t want to waste any more of your client’s time when they already love a particular design as it is.
So, send the final product to the client in their desired file format, then boot up your invoice software!
Pro tip: You should also take this opportunity to look back at the project and note down all the lessons learned. This approach is a great way to ensure your graphic design process and practice at large are constantly improving.
You can start by analyzing the amount of time you spent at each stage. You can also look at the kind of feedback you received from the client. Are there any lessons you can pick there to help you make better designs for your next project?
Design better and impress your clients with a solid workflow plus the right tools
A good workflow helps you optimize this process to ensure that everything runs smoothly and that the final product meets your client’s standards.
As you’ve learned in this guide, a good design workflow starts with analyzing the design brief. The document shows you the client’s expectations of the design. The next step involves researching the design topic. That’s where you will conduct client research, competitor research, and target audience research. The research gives you a clue of what the ideal design could look like.
Brainstorming and mood boarding takes place in the third stage. Decorate the mood board with all the valuable insights collected from the research phase. Then, brainstorm potential design ideas with your team.
From there, create an outline or sketches of the design and send them to your client. The client will reach back with feedback which you can now use for concept refinement. Finally, complete the project by sending the final product files to your client.
Finally, you can take more steps to improve your productivity and work more efficiently. Using Piktochart’s templates is a great first step. Try Piktochart for free.