Zoom is the new standard for digital video communication, but it isn’t without its quirks.
Calls may get disconnected due to a bad internet connection. People in a meeting may be distracted, or not able to join at all.
That’s when the ability to record your Zoom calls comes in handy. You can save and share your Zoom calls with those who missed out.
But just recording is not enough. You might also want to edit a Zoom video to remove unnecessary parts. This way, you can also split your video into small, digestible chunks—especially useful if you’re creating content like an instructional video.
Feeling overwhelmed just thinking about it?
When planning for your Zoom meeting recording, you probably conjure images of complex video editing software in your head — tools that probably take years to learn and master.
In fact, in a survey, only 26.8% of respondents said video creation and editing is easy for them.
It doesn’t have to be this way.
Edit Zoom recordings with Piktochart Video (Formerly Piktostory)
If you prefer to watch this guide in video format, we’ve got you covered below.
Table of contents:
By the way, trim your Zoom recording in just 3 simple steps using a tool like Piktochart Video and without learning complicated software.
Sign up for a free account so you can follow along later in this guide.
But first, let’s take a closer look at why you should edit a Zoom meeting.
Why you should edit your Zoom video recordings
Of course, nothing is stopping you from recording and sharing your entire meeting as it is.
But there are two problems with this approach:
1. People are busier than ever and they may not have the time to go through lengthy Zoom recordings.
A lengthy Zoom video presentation will be a string of awkward pauses, unexpected silences, and irrelevant chit-chat. There’s a high chance that no one will watch it again. All it will do is collect dust in a folder somewhere on your cloud storage.
So if you want to get your message across, the only way to ensure that is to edit your Zoom recording.
Before you share the video with prospects and coworkers, customize it and trim the useless parts. So you can easily share the key moments from the meeting.
2. If you don’t trim a Zoom recording, its potential to engage people on different online and offline platforms is limited.
The good news is cutting it into snackable clips will help expand its reach. For example:
- Splitting your webinar into separate tips can give you a lot of content to share on social media and gain more followers.
- Isolating important material can help you present your ideas professionally in offline events and town hall meetings.
Whether you want to build excitement inside or outside our organization, you can’t have a powerful impact without getting rid of the fluffy parts from a Zoom recording.
You must make sure that your final video is to the point and chock-full of substantial content.
In doing so, you will not just capture attention but also improve its viewing experience.
Where to find your recordings in Zoom
If you don’t know how to record your Zoom calls or where to find your recordings, let’s do a quick recap.
To record a Zoom call, just start a meeting as a host and click the circular Record button.
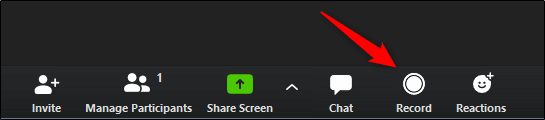
Once you do, the recording will begin. When the meeting ends, Zoom will take some time to process the recording and automatically make it available to you for download. It will also send you an email notification to access your recording.
Alternatively, you can also find all your Zoom recordings on the desktop client. You can go to Meetings > Recorded.

You’ll be presented with all the previous meetings that you recorded and saved locally and on the cloud. From there, just select the meeting you want to edit.
How to edit your Zoom recording with Piktochart Video
Now that you know how to access your Zoom recordings, let’s get to the fun part — firing up Piktochart Video.
Piktochart Video is an easy and powerful video editor. It lets you record, brand, transcribe, isolate, annotate, and share the highlights of your virtual meetings as short video clips.
Zoom typically records meetings in MP4 or M4A formats, and both of these are easy to edit in Piktochart Video.
Now, before we launch Piktochart Video, make sure that you’re using the latest version of Google Chrome or Mozilla Firefox.
You can use Microsoft Edge, Internet Explorer, Safari, and previous versions of Firefox, but these browsers are not known to work well with Javascript. And Javascript is a core part of how Piktochart Video works.
These browsers may still work on occasion, but they won’t give you the best editing experience. If you’re unsure about your browser version, you can also use the Browser Update tool to see if you have the current version.
Now it’s time to trim your original video!
Edit your Zoom videos in 3 easy steps
Repurpose your webinars, Zoom recordings, and virtual events into shorter clips with Piktochart Video.
Try Piktochart Video for free
Step 1: Launch Piktochart Video
Your first step is to head over to Piktochart Video and click Sign Up.
Once you do, you’ll see an option to use your email or Google credentials to create an account.

Simply complete the sign-up process to reach your Piktochart Video Dashboard.
Step 2: Upload Zoom recording to Piktochart Video
You can import your Zoom recordings and upload video directly into Piktochart Video . But to be able to do so, make sure that you have a premium Zoom account because cloud recordings are available only on Zoom’s paid plans.
Log in to your Piktochart Video Dashboard and click Import from Zoom.

From there, log in to your Zoom account and follow the instructions to authorize Piktochart Video to fetch your Zoom recordings.
Next, click Import from Zoom once again and select the recording you want to edit.

Your video will now be imported and will be ready to edit with Piktochart Video.
Step 3: Edit Zoom video in Piktochart Video
Once your video has been imported, you’ll see that Piktochart Video has automatically created its transcript using machine intelligence — without you having to lift a finger!
If some parts of the transcript aren’t accurate, worry not. The editing process is as simple as editing any text document.
Simply select the parts you want to remove or edit, or just click where you want to add new information. Then type in to make your changes.
Similarly, it’s a breeze to delete or remove the parts that are not adding any value to the video. Just click and drag across the transcript lines to select the portion you want to get rid of. Then click Remove. Easy right?

Well done! If you just want to do some basic trimming and editing, then that’s all you need to know. You can stop right here and start editing a Zoom meeting.
For any videos you edit using Piktochart Video, you can log in to your Dashboard at any time to access full recordings, video highlights, and transcripts.
However, if you have enjoyed using Piktochart Video so far, we bet you want to do more than just trim Zoom videos.
Zoom video editing best practices
There are a lot of cool things you can do with Piktochart Video!
Let’s take a look at some the tips and best practices below.
Step 1: Add video captions to improve accessibility
People working from an office or a public place often watch videos on silent. Plus, some are hard of hearing.
For this reason, your video should be accessible to all types of audiences.
Using Piktochart Video, you can easily add subtitles or captions that explain the content of your video.
When editing a Zoom recording with Piktochart Video, each transcript line indicates the caption that viewers will see while watching the video.
If you want to move a part of the line to a new position, just left-click at the start of that transcript. Then press ENTER or BACKSPACE key depending on whether you want to move it below or above the current position.

2. Customize brand elements in your video
Branding is an important part of giving a professional and memorable look and feel to your Zoom recording. That means your video should be aligned with your brand guidelines.
Luckily, Piktochart Video lets you customize many aspects of your Zoom video to reinforce your brand. These include your video’s fonts, color palette, intros, outros, and much more!
To customize your new video background, for example, just click the video preview on the right.
You’ll see a menu bar appear at the top of your video, along with a color picker to change your video’s background color. Once you have picked a color, click OK, and you’re all set.

Editing the video title is just as simple. Click on the title textbox and type or delete text as you normally would.

While you’re editing the text, you’ll also see a formatting panel appear at the top. You can use the options in this panel to change font family, size, styling, color, and so on.

3. Add your brand logo
We already discussed how important branding is, and your brand identity isn’t complete without a logo. To add your brand logo to the video, you’ll need the Piktochart Video paid plan.
Once you become a paid subscriber, click Projects to locate your video and navigate to the settings above the video preview.
Click Upload Image and select the logo you want to upload. Now all you need to do is to reposition the image by dragging it with your mouse.
4. Reposition elements for better viewing
Another great feature you get with Piktochart Video is to drag the elements in your video and position them as per our preferences.
Whether it’s the title, a caption, or the video itself, you can click on any element you want to move.

You’ll see a blue rectangle appear around the element. That’s your cue to start dragging it with your mouse to another location.
Here’s the kicker. Piktochart Video doesn’t just let you edit a Zoom video instantly, but also share it on social media to engage your followers!
Once you have created a video clip, just go to the Clips panel in your Piktochart Video Dashboard and locate your clip. Click the 3-dotted lines at the bottom of the clip and then select Share.
From there, you can select a social media channel or share link by copying the URL.

Moreover, you can also change your video’s aspect ratio to what’s best suited for your target social media platform. For example:
- 16:9 for LinkedIn or YouTube
- 9:16 for Instagram Stories or TikTok
- 1:1 for Instagram Posts
- 4:5 for Facebook or Twitter
Simply click on the video preview on the right. Then select your desired aspect ratio from the menu bar that appears above the video.

Can you edit Zoom recordings for free in Piktochart Video?
YES! Piktochart Video allows you to upload up to 30 minutes of video every month for free editing.
Your video will have watermarks, but that’s a small price to pay for the substantial value you get.
Once you have exhausted your 30-minute limit or you want to remove watermarks, you can always upgrade to one of Piktochart Video’s paid plans.
Ready to edit your Zoom recordings?
By now, you have all the tools and tricks you need to trim your Zoom recording without learning complicated software.
As you can see, Piktochart Video makes the whole process really easy. In a few minutes of editing, you get highly presentable and engaging videos to wow your audience. Whether you’re creating branding videos or content for your internal communications campaign, you now know how to edit your Zoom videos like a pro.
So no more excuses. Start editing a Zoom meeting recording today and make sure to add captions for improved accessibility.
With Piktochart Video, you know it’s going to be a breeze! Sign up for a free account and start editing.